Practical guidance for life after 50 · Read, listen, and keep moving.
Podcast visual companion
Zero-Friction Strength After 50
Turn controlled tension into practical strength. This three-day home plan shows the start and working positions for every isometric hold and slow-tempo exercise discussed in the podcast.
Train on three nonconsecutive days and rest 60–90 seconds between sets.
!
Static holds can temporarily raise blood pressure
Keep breathing and avoid maximal-effort squeezing. If you have uncontrolled high blood pressure, heart disease, recent surgery, balance concerns, or unexplained symptoms, ask your healthcare professional how to scale this routine. Stop for sharp pain, dizziness, chest pain, faintness, unusual shortness of breath, numbness, or sudden instability.
Workout 1 of 3
Day 1: Lower-Body Stability & Posture
Build steady tension through the legs, hips, calves, and upper back without rushing the movement.
Follow the written setup and coaching cues below. The pictures show general positions; your comfortable range may be smaller.
1
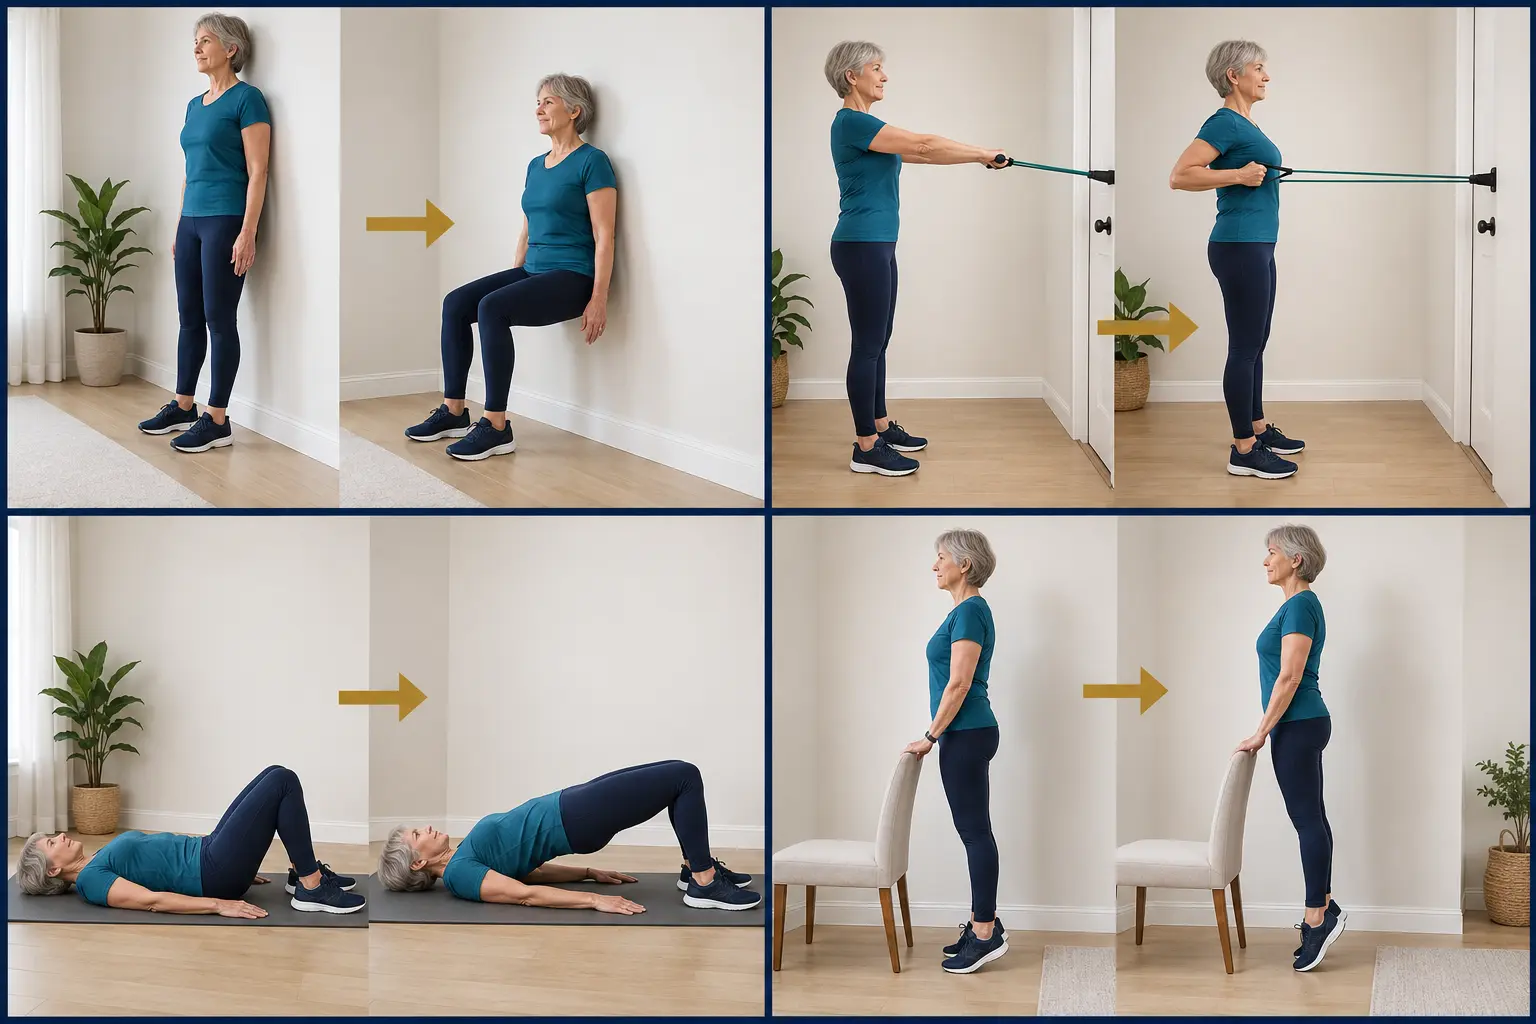
Wall Sit
3 sets × 20–30-second hold
Primary target: Quadriceps, glutes, and knee stability
Setup
Stand with your back against a smooth wall and walk your feet slightly forward, about hip-width apart.
How to perform it
Brace gently and slide down only as far as your knees tolerate comfortably.
Keep your feet flat, knees aligned with your toes, and lower back supported by the wall.
Breathe steadily during the hold, then press through your feet and slide back up.
Coach's cue: A shallow bend still counts. Build tension in the thighs without forcing a 90-degree position.
Make it easier: Hold higher on the wall, shorten the interval to 10 seconds, or perform a supported chair squat hold.
2
Band Isometric Row
3 sets × 8–10 reps with a 4-second hold
Primary target: Mid-back and posture
Setup
Secure a resistance band to a purpose-built anchor at about chest height. Test the anchor before stepping back.
How to perform it
Stand tall with light tension in the band and your arms reaching forward.
Pull your elbows toward your ribs without leaning backward or shrugging.
Squeeze your shoulder blades for four seconds, then return slowly with control.
Coach's cue: Think ‘elbows back, shoulders down.’ The pause—not a hard yank—creates the work.
Make it easier: Use a lighter band, sit in a sturdy chair, or shorten the range if the shoulders feel pinched.
3
Glute Bridge Hold
3 sets × 20–30-second hold
Primary target: Glutes and hamstrings
Setup
Lie on your back with knees bent, feet flat, and arms relaxed beside you.
How to perform it
Gently brace your abdomen and press through your whole foot.
Lift your hips until your body forms a comfortable line from shoulders to knees.
Squeeze the glutes without arching the lower back, breathe, and lower slowly.
Coach's cue: Stop the lift when the glutes are tight; extra height should not come from the lower back.
Make it easier: Lift only a few inches, use shorter holds, or perform repeated slow bridges instead.
4
Standing Calf Hold
3 sets × 15–20-second hold
Primary target: Calves, feet, and ankle stability
Setup
Stand beside a wall or sturdy chair with your feet parallel and use one hand lightly for balance.
How to perform it
Press evenly through the balls of both feet and slowly raise your heels.
Pause at a comfortable height without rolling your ankles outward.
Keep breathing, then lower your heels slowly to the floor.
Coach's cue: Grow tall through the crown of your head and keep equal pressure across both feet.
Make it easier: Use both hands for support, hold for 5–10 seconds, or perform the exercise seated.
Workout 2 of 3
Day 2: Joint-Friendly Upper Body & Core
Train pushing strength, shoulder-blade control, and trunk stability with stable home surfaces.
Follow the written setup and coaching cues below. The pictures show general positions; your comfortable range may be smaller.
5
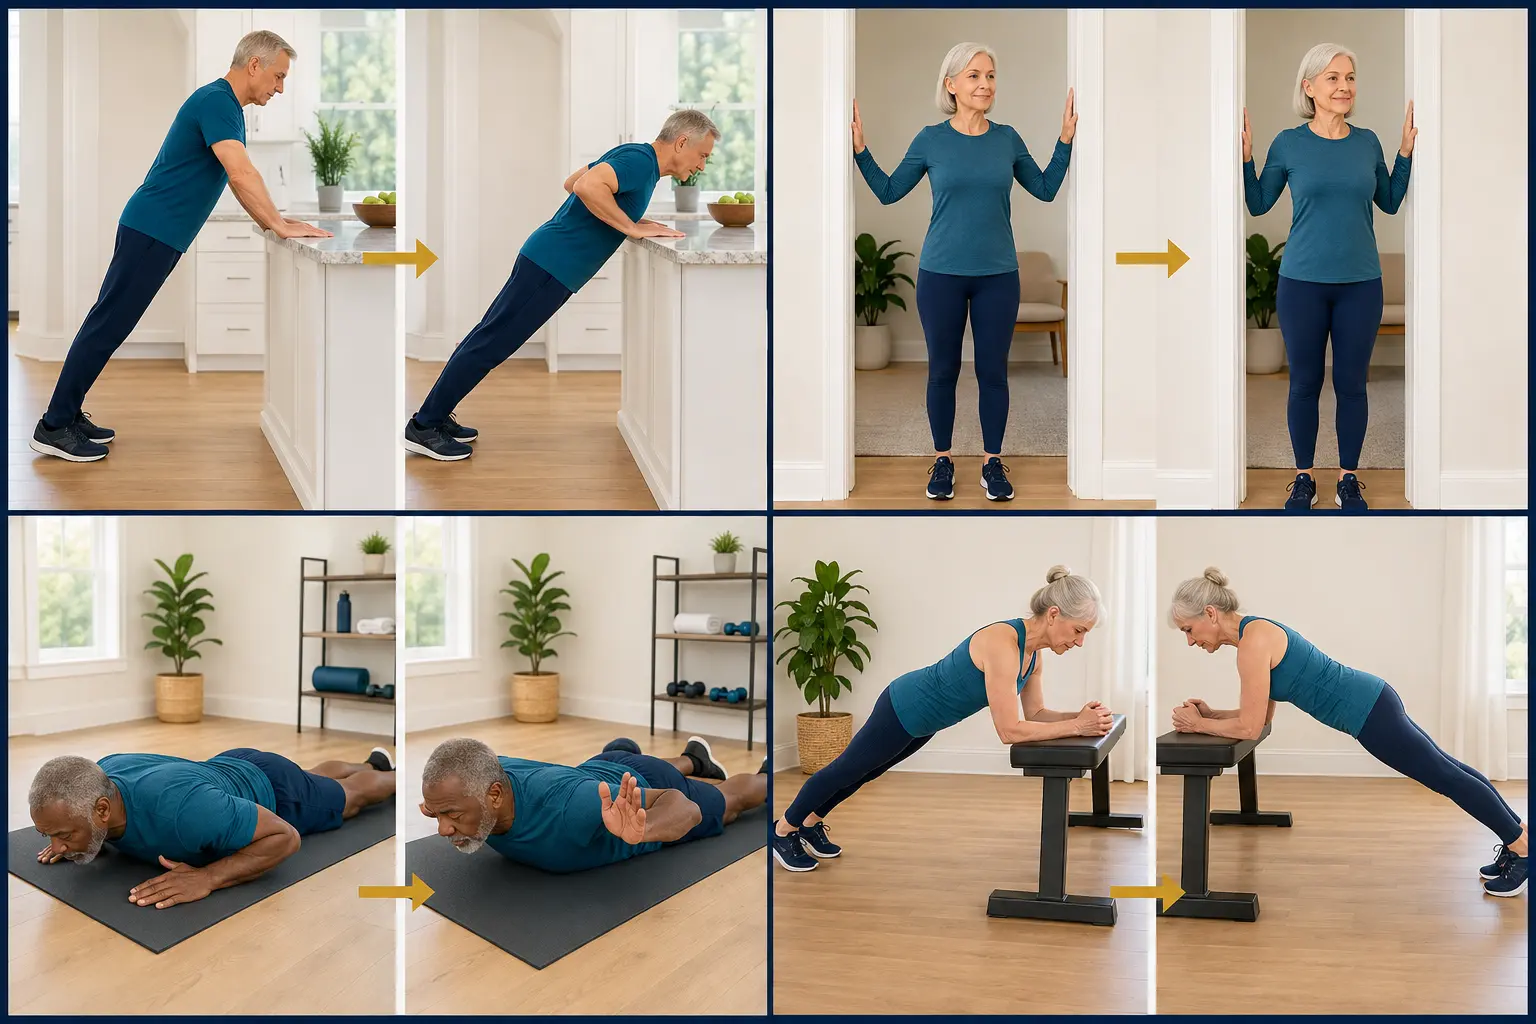
Slow Incline Push-Up
3 sets × 6–8 reps with a 4-second lowering phase
Primary target: Chest, triceps, and shoulders
Setup
Place your hands on a sturdy counter or wall, slightly wider than shoulder-width, and step back into a straight-body position.
How to perform it
Brace your abdomen and keep your head, ribs, hips, and heels in one line.
Take four full seconds to bend your elbows and bring your chest toward the surface.
Pause briefly, then press away smoothly without snapping the elbows straight.
Coach's cue: The higher your hands, the easier the exercise. Keep your shoulders away from your ears.
Make it easier: Use a wall instead of a counter or reduce the depth while preserving the slow lowering phase.
6
Isometric Doorway Chest Press
3 sets × 15–20-second hold
Primary target: Chest and front shoulders
Setup
Stand centered in an open doorway with your forearms against the frame and your elbows below shoulder height.
How to perform it
Stand tall with soft knees and keep your ribs stacked over your pelvis.
Gradually press your forearms inward against the frame over two to three seconds.
Maintain steady pressure and normal breathing, then release gradually.
Coach's cue: Ramp up from about 50% effort. Do not slam or jerk into an immovable surface.
Make it easier: Use one arm at a time with very light pressure, or press your palms together in front of your chest.
7
Prone W Hold
3 sets × 20-second hold
Primary target: Rotator cuff and upper back
Setup
Lie face down on a mat with your elbows bent into a W shape and your forehead supported on a folded towel if needed.
How to perform it
Gently draw your shoulder blades down and toward each other.
Lift your hands and chest only slightly while keeping your neck long.
Hold without shrugging or pinching the lower back, then relax completely.
Coach's cue: This is a small upper-back movement. More height is not better.
Make it easier: Perform the same W squeeze while seated or standing with a slight hip hinge.
8
Modified Elevated Plank
3 sets × 15–25-second hold
Primary target: Core and lower-back protection
Setup
Place your hands or forearms on a stable bench or counter and walk your feet back until your body forms a straight line.
How to perform it
Press away from the surface and lightly tuck your ribs toward your pelvis.
Squeeze your glutes and keep your head aligned with your spine.
Breathe quietly during the hold, then walk your feet forward to finish.
Coach's cue: Raise the surface if your hips sag or your lower back takes over.
Make it easier: Use a wall plank or perform a short plank from your knees on a padded mat.
Workout 3 of 3
Day 3: Total-Body Tension & Balance
Combine supported leg work, a slow chair squat, upper-body tension, and cross-body core control.
Follow the written setup and coaching cues below. The pictures show general positions; your comfortable range may be smaller.
9
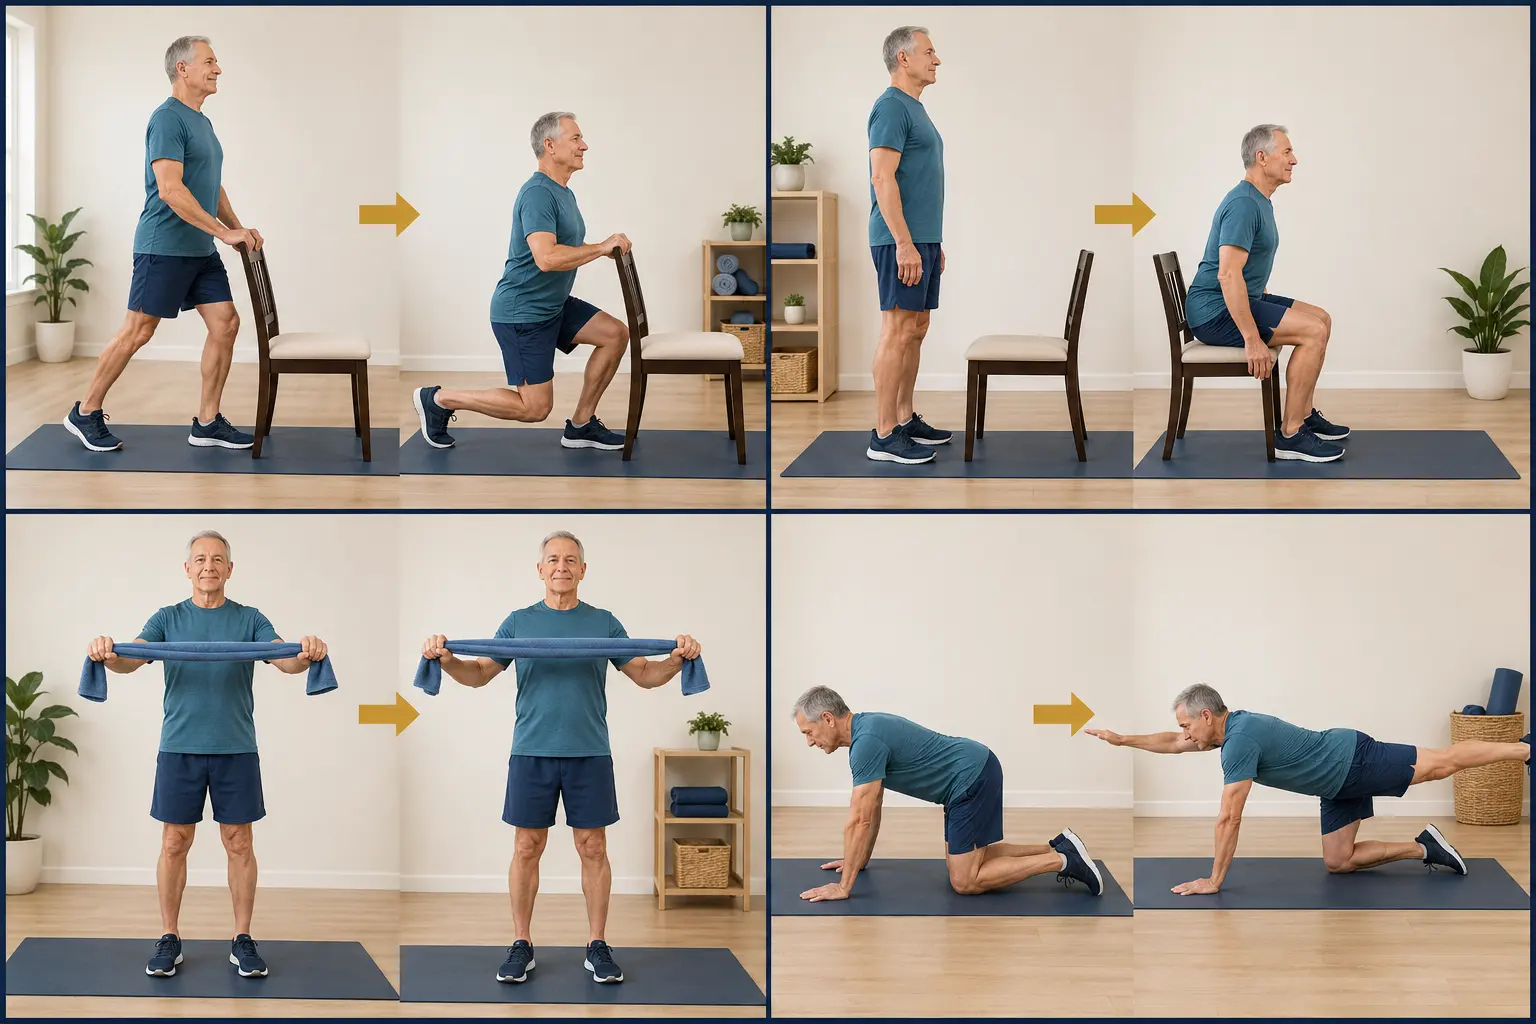
Supported Static Lunge Hold
3 sets × 15–20 seconds per leg
Primary target: Quadriceps, glutes, and balance
Setup
Stand beside a sturdy chair in a comfortable split stance and keep one hand available for balance.
How to perform it
Keep your torso tall and lower straight down into a shallow split squat.
Hold where both feet feel secure and the front knee tracks with the toes.
Breathe steadily, press through the front foot to rise, then change sides.
Coach's cue: Choose stability before depth. A small bend can create plenty of useful tension.
Make it easier: Use two hands for support, shorten the stance, or hold the split stance without lowering.
10
Slow Eccentric Chair Squat
3 sets × 6–8 reps with a 4-second lowering phase
Primary target: Legs, glutes, and hip control
Setup
Stand just in front of a sturdy chair with your feet at a comfortable width and the chair secured against movement.
How to perform it
Reach your hips back and begin bending your knees while keeping your whole foot grounded.
Count four slow seconds as you lower until you lightly touch the chair.
Pause without collapsing, then lean slightly forward and stand smoothly.
Coach's cue: Own the descent. The chair is a depth guide, not a place to drop or bounce.
Make it easier: Use a higher chair, place your hands on your thighs, or use a stable support beside you.
11
Isometric Towel Lat Pull
3 sets × 20-second hold
Primary target: Lats, upper back, and shoulder stability
Setup
Hold a towel horizontally at chest height with hands wider than shoulder-width and elbows softly bent.
How to perform it
Stand tall and draw your shoulders down away from your ears.
Pull outward on the towel as if trying to stretch it without changing its length.
Maintain moderate tension and normal breathing, then release slowly.
Coach's cue: Keep the towel at chest height if reaching overhead is uncomfortable.
Make it easier: Use less pulling effort, shorten the hold, or use a light resistance band row.
12
Bird-Dog Hold
3 sets × 10 seconds per side
Primary target: Core, hips, shoulders, and spinal stabilizers
Setup
Begin on hands and knees with hands under shoulders, knees under hips, and your spine comfortably neutral.
How to perform it
Brace gently and slide one leg back while reaching the opposite arm forward.
Lift only until the arm and leg are about level with your torso and keep your hips square.
Hold while breathing, return slowly, and repeat on the other side.
Coach's cue: Imagine balancing a glass on your lower back. Reach long rather than lifting high.
Make it easier: Move only one limb at a time or keep the toes of the extended leg on the floor.
Progress with control
Add time before intensity
Start near the low end of each hold or repetition range. When you can complete every set with steady breathing, stable posture, and no concerning joint response later that day or the next, add a few seconds or one repetition.
Learn the position. Use the easiest stable version first.
Own the breath. Exhale normally throughout every hold.
Add a little time. Increase holds by about five seconds.
Then add resistance. Use a slightly stronger band only after control is solid.
Make the routine yours
Want help choosing the safest starting versions?
Coach Bob can help you match the exercises to your current strength, joint comfort, balance, available equipment, and goals.